

Quick start guide
This guide contains useful installation information
1. Quick start checklist
This section provides basic information to enable a quick installation of the Pycno sensors. This guide also contains additional information and troubleshooting steps.
Correct site selection
This will ensure that the sensors won’t encounter any connectivity issues due to bad signal, or loss of power due to incorrect placement. See section 6.
Soil installation
Read the guidelines on sensor placement and minimizing soil damage. Do not apply any force on the sensor while installing. Use the installation kit provided.
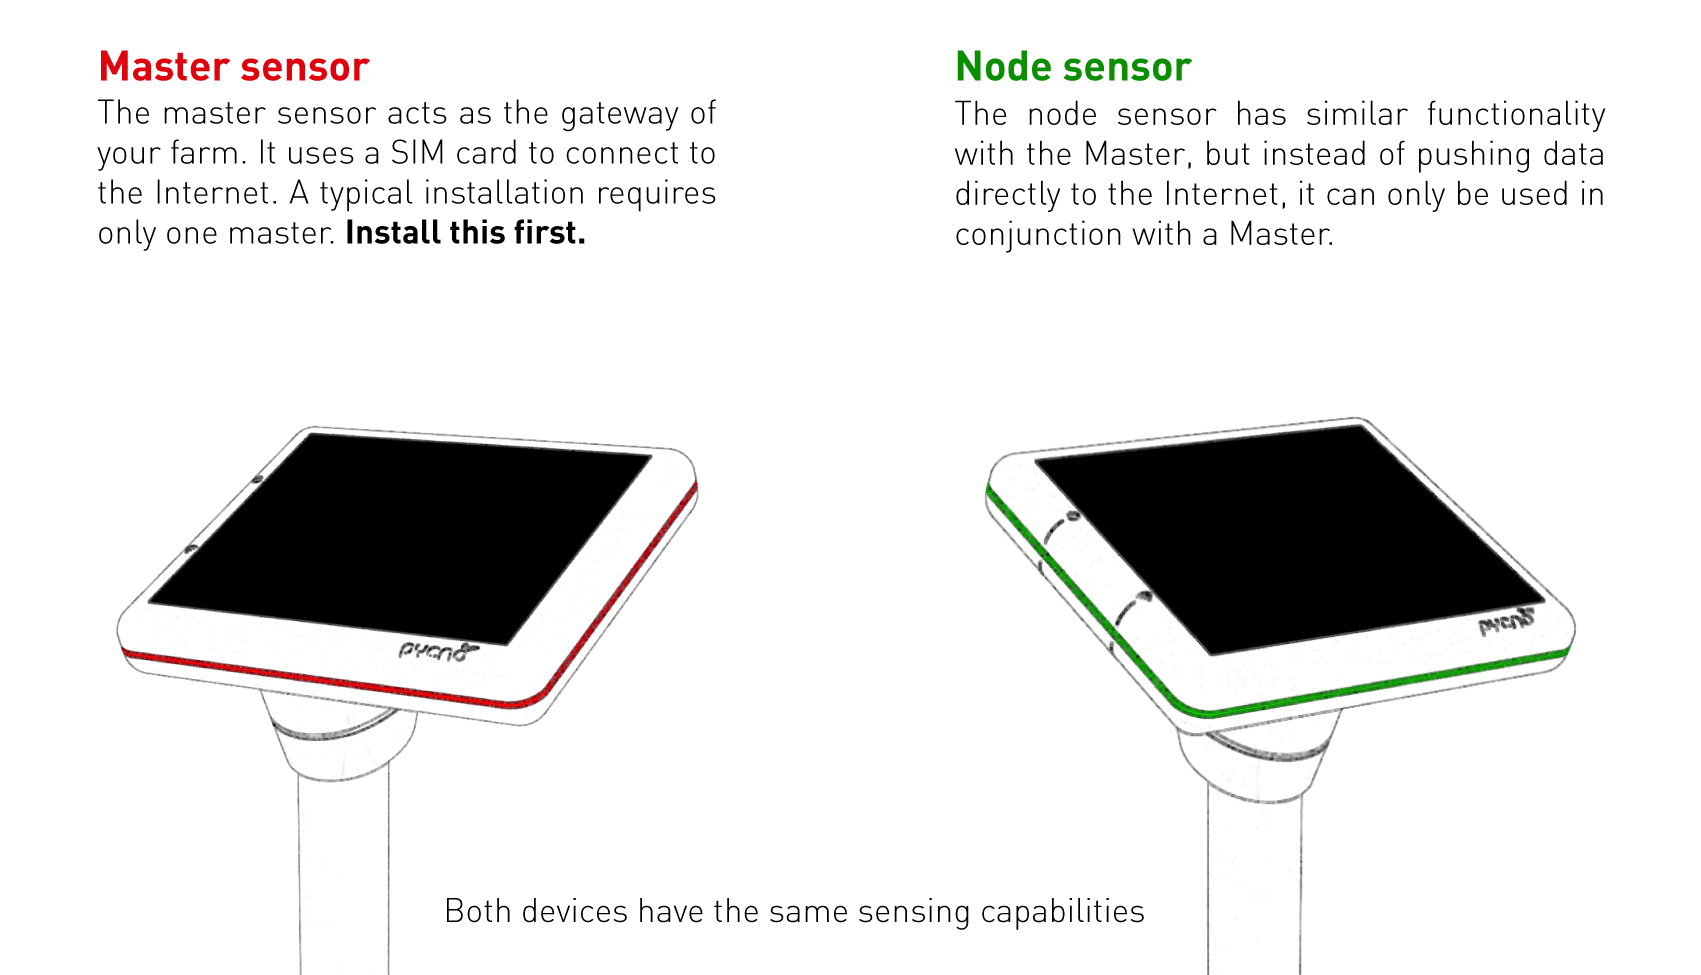
Master sensor install
Using the installation kit, install the sensor, press and hold the power button and wait a few minutes for the green LED. Proceed to install the end-nodes.
Node sensor install
Place into the ground, press and hold power button, wait until the green LED turns ON. A Master sensor needs to be installed first.
Viewing your data
Click Login at the top of this page to access your data. You should have received your login details by email upon purchase.
2. System overview
2.1 Identifying your sensors
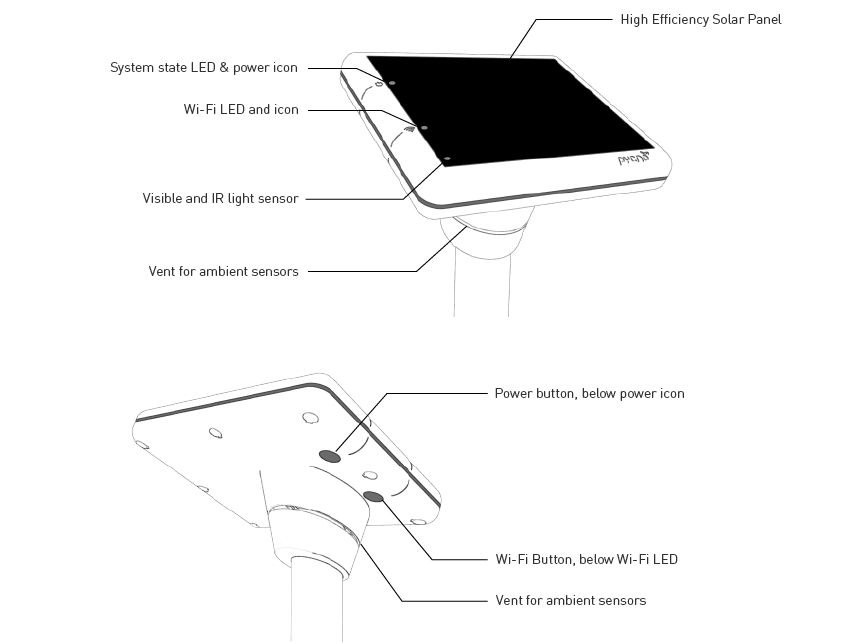
2.2 Location of features and controls
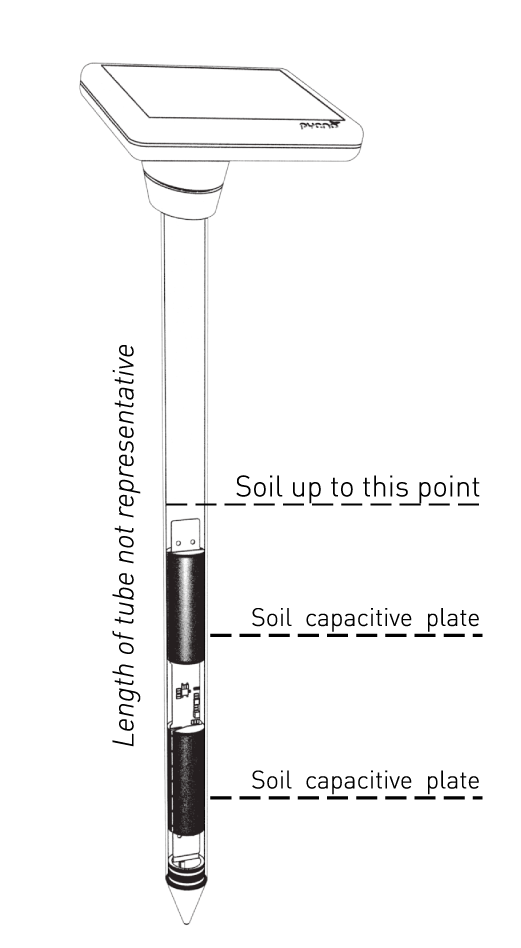
3. Sensing overview
The location of each sensing element is displayed below. The capacitance plate orientation is also shown for the longer probes.

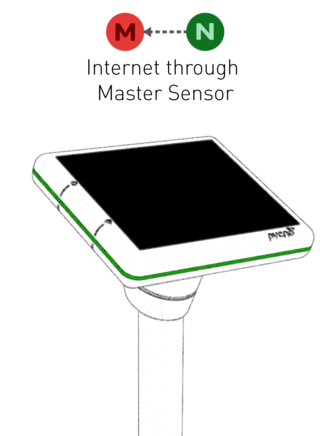
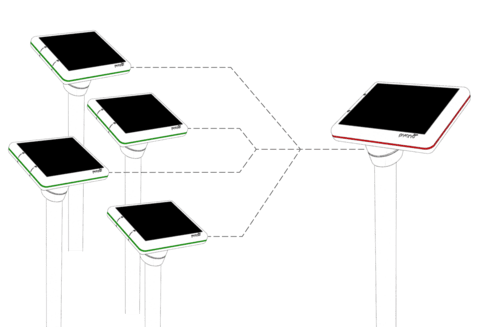
4. Sensor local network
As shown below, the sensors form a network with each other, while a Master sensor, their gateway, collects all the sensor readings and pushes them to the Internet using cellular connectivity. This is achieved with a SIM inside the Master sensor. This local network allows for more sensors to be added at a later stage.
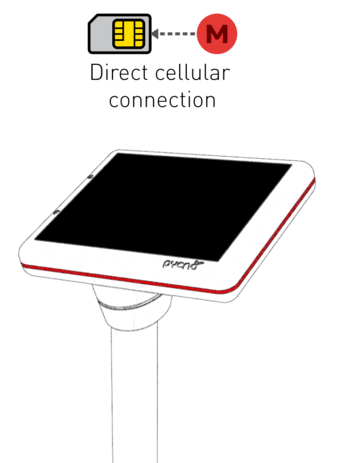
5. Master connectivity
The Master sensor comes with a pre-installed SIM card. This makes it easy for the grower as there is no need for toping-up. The SIM is also roaming, which allows the sensor to connect to any nearby network, bypassing restrictions that one-network SIMs have. That ensures that the network with the best signal can be used, greatly increasing the performance of the sensor.
6. Selecting an installation area
Ensuring good reception
Before installing the sensor the user must first check that the installation site has good GSM reception. To check your area for coverage, simply check your mobile phone’s signal. If possible, having GPRS, 3G, 4G connectivity helps verify that the area has capable base stations that can serve mobile Internet.
Installation location
Sensors can be placed up to 500 meters apart from each other to ensure better reception rates. For longer distances, an additional Master can be added as an additional gateway. We recommend 1 sensor every 2-5 Hectares based on crop and soil homogeneity.
Sensor orientation for optimal solar panel performance
The orientation of the sensor is very important in order to get adequate sunlight. As a rule of thumb, if you are located in:
- Northern hemisphere - Point the sensor South
- Southern hemisphere - Point the sensor North

This orientation ensures that the device will collect enough energy throughout the day.
7. Soil sensor considerations
As the sensor will be used for irrigation monitoring, installing the sensor in a representative area is crucial to the validity of the data.
To correctly estimate, drainage, soil capacity, etc. soil needs to stay as undisturbed as possible. To achieve that, ensure that the sensor is as perpendicular to the soil and that the supplied installation kit is used.
The sensor features capacitive plates that measure soil moisture through the plastic, at a radius of 10 cm. These modules can be daisy-chained together to form a sensor of up to 1.2 meter length.
8. Device buttons
The device has 2 buttons on the bottom. The upper button is the power button and the one below acts as a secondary function button. The buttons can be pressed momentarily or pressed and held down for a few seconds.
In summary the buttons can be pressed in the following ways:
- Momentary press on any button - Wakes up LEDs and displays current status.
- Long press (>4 sec) of Power button - Powers the device ON or OFF. Press combination and release when a beep is heard.
- Long press (>4 sec) of Secondary button - Toggles Wi-Fi ON or OFF (not released yet). Press combination and release when a beep is heard.
- Long press (>4 sec) of Both buttons - Send a test call, with the latest sensor measurements. If its a Master (Red) it will initiate a GSM upload. If the device is a node (Green) it will send its measurements to the nearest Master. Press combination and release when a beep is heard.
When a tone is heard, release the button immediately.
Other button functionality
Upon startup, the device will test its own communications within the first few minutes. A beeping sound accompanied by the green system status LED, indicates that the sensor node is configured successfully. While sending data, the sensors blink purple.
If there is an error with the previous call, the sensor will blink yellow. If purple is also blinking, that indicates that the sensor is retrying. If not, the sensor is not currently retrying, but will do so later. To manually trigger a test call, press and hold BOTH buttons for more than 4 seconds, until a beep is heard.
The master sensor uses its built-in SIM card to communicate with the outside world. This process varies between 1-5 minutes, depending on the location.
The end-node sensor, during a test, sends its readings to the closest Master. Calls take up to 3 minutes.
9. System state indicator LED
The LEDs, display status information about the sensor’s health & state. They timeout and turn OFF after a few minutes of inactivity, in order to save battery. Clicking any of the buttons wakes the LEDs. The way that the LEDs display information is by cycling between each of the states. For example if the colors, purple and cyan are alternating, it means the sensor is sending data, but it has low signal strength. The data might still go through, but its recommended to install the sensor at an area with good signal. See “Selecting an installation area”, for more info on how to use your phone to determine coverage.
Sensor blink types:

10. Wi-Fi Interface (Coming soon)
Allows you to view data and the health status of the sensor, directly, over Wi-Fi. Future versions will also allow manual collection/download of data to your phone or laptop.
11. Troubleshooting
After more than 5 minutes since first power-up, yellow LED is still blinking
If you see the yellow LED blinking after 5 minutes it means that the previous call failed. If there is no purple LED (which indicates an ongoing call is in progress) you can re-trigger a GSM call. Press and hold both buttons for 3-5 seconds, until a beep is heard. You will now see a purple LED. Wait until the call is finished.
Yellow LED is seen (Not from start-up)
As mentioned above, a test call can be triggered to determine if the failed call was an isolated incident. If the purple LED is blinking, the unit is retrying. Look for any other signs; red LED (battery issue), cyan LED (signal issue), etc. might be the causes of the problem. If the problem persists, contact us, as there might be an issue with the SIM itself.
Cyan color is seen
If no purple LED is blinking, trigger a test call, if the LED state is the same after the call, move the unit to a different location. If the unit was working before, it might be a network issue such as basestation maintenance. Cross reference with your mobile phone or try again later.
12. Key specs
High efficiency monocrystalline 2W Solar Panel.
Solar irradiance (IR + visible light LUX) – Accuracy: +/-10Lux, Resolution: 0.1 Lux,
Solar irradiance (Watts per m2) – Accuracy: 1 W/m2, Resolution: 1 W/m2,
Air Temperature – Range: -40~85°C – Accuracy: +/-0.3°C, Resolution: +/-0.005°C
Air Humidity – Range: 0~100%RH – Accuracy: +/- 2% , Resolution: 0.01%
Soil Temperature – Range: -40~85°C – Accuracy: +/-0.3°C, Resolution: +/-0.005°C
Capacitive Soil Moisture – Resolution: 0.01mm, Accuracy +/- 1mm
3490mA/h Internal battery providing months of power even without sunlight
Above performance depends on installation and placement.


